

You’ll start by measuring weld cross-section and length to get weld volume, convert that to deposited metal weight using steel density and a recovery factor, then calculate arc time from deposition rate and operating efficiency. Multiply realistic arc hours by your loaded labor rate, add filler/electrode mass and shielding‑gas volumes with waste allowances, then include equipment depreciation, power (kW×hours×rate) and proportionate shop overhead. Follow the step-by-step formulas and examples that follow to get verified, bid-ready costs.
Why Accurate Welding Cost Estimation Matters

Because underquoting can erase profits and overquoting will cost you bids, accurate welding cost estimation is the backbone of any competitive fabrication business.
You’ll treat estimation challenges as measurable variables: hidden costs like power consumption, consumable burn rates, and labor overhead must be quantified. Use importance factors to weight risks—tight schedules, rework probability, and material yield losses—and fold them into contingency percentages.
Set a realistic labor rate that includes wages, payroll taxes, benefits, and shop overhead (typically $55–$60/hr) rather than a bare hourly wage. Build the total cost from labor, consumables, power, and base materials so every line item has a numeric basis.
Accurate estimates let you price competitively and make informed budget decisions.
Breakdown of Welding Cost Components

Now let’s break the cost down so you can price jobs accurately: start with labour and overhead — include wages plus benefits, overtime, and shop burden that typically push the loaded labour rate to about $55–$60/hr.
Then quantify materials (base metal, filler, shielding gas, consumables) and allow for waste/loss percentages in your takeoff.
Finally, add equipment costs from depreciation, rentals, maintenance and energy so your unit cost reflects true, competitive pricing.
Labour and Overhead
Start by recognizing that labour and overhead together make up a large, measurable slice of welding cost—typically $55–$60 per hour when you include wages, payroll taxes, benefits and shop burden—and overlooking any of those elements will skew your estimates.
You need to convert that blended rate into per-arc-minute or per-joint costs using measured labour efficiency and an operating factor (arc time ÷ shift time). Be explicit about overhead allocation so indirects like plant depreciation and management get charged pro rata.
- Measure labour efficiency: record arc time, idle time, and rework to derive realistic OF (often 20–40%).
- Calculate loaded labour rate: wage + payroll taxes + benefits + shop burden.
- Allocate overhead: distribute fixed site costs across billable hours for accurate unit pricing.
Materials and Equipment
Having quantified labour and overhead per arc-minute, you’ll next quantify the materials and equipment that drive the rest of the unit cost.
You’ll list material types: base metal, filler metal, shielding gas, and consumables, estimating required weld metal weight from joint geometry and deposition rate.
Multiply kilogramage by unit prices and add waste/scrap allowance (typically 5–15%).
For equipment selection, calculate depreciation or rental per hour, scheduled maintenance, and power consumption (kW × hours × electricity rate).
Add consumable replacement and incidental tools.
Sum materials and equipment costs and divide by produced arc-minutes to get unit cost contribution.
Don’t forget overhead allocations for utilities, facility, admin, and safety gear in the final per-unit estimate.
Measuring Weld Volume and Deposited Metal Weight

First calculate the weld cross-section area from its geometry (e.g., triangular, semi-elliptical) and multiply by weld length to get volume V = A × L.
Convert that volume to mass by multiplying V by material density (for example 0.283 lb/in³) and then apply the recovery (or over-welding) factor to account for actual deposited versus theoretical metal.
The resulting deposited metal weight gives you the precise filler requirement and material cost input for your estimate.
Products Worth Considering

Product Description : Metal Repair Glue is a two-component, heavy- duty, high-temperature resistant, waterproof epoxy glue, it comes in 1.76oz container, including a set of pusher, scraper and mixed ratio 1:1 syringe. It is a non-irritating odor liquid metal cold welding adhesive, welding glue cures quickly, once cured, metal repair glue can form a strong and stable permanent bond.

PLJOFRSHI Metal glue is a two-component heavy duty high temperature resistant epoxy resin glue with capacity of 1.76oz for each,including a set of pusher, scraper and mixed ratio 1:1 syringe,can be used for boats, cars, Oil tanks, water pipes, heaters, vases, fences welding car bumpers, motorcycle crack repair,It is a good nontoxic and nonirritating odor cold welding glue.

Calculating Weld Cross‑Section
One practical way to determine weld cross-section is to divide the bead into simple geometric shapes—rectangles, triangles and parabolas—calculate each area, then sum them to get an accurate cross-sectional area; multiply that area by the total weld length to get volume (V = A × L), and multiply volume by the weld metal density to obtain deposited weight, which you’ll use to size filler requirements and consumable costs.
Use clear weld geometry sketches and precise area calculation for repeatability. For example: A = 2.47 in², L = 14 in → V = 34.6 in³; next multiply by density to get weight.
- Measure bead dimensions and decompose into shapes.
- Compute each area, sum for A.
- Multiply A × L for V, then weight.
Converting Volume to Mass
When you know the weld’s cross-sectional area and length, convert that volume to mass with Mass = Volume × Density, using the material’s specific density in consistent units; for example, A = 2.47 in² and L = 14 in gives V = 34.58 in³, and at 0.283 lb/in³ the deposited metal weighs 34.58 × 0.283 = 9.79 lb.
Next, get precise volume measurement by multiplying A × L; record units (in³, mm³). Then multiply by weld density for the material you’re welding—use supplier or handbook values and guarantee units match (lb/in³, g/cm³).
Keep calculations per weld run and sum runs for total deposited mass. Accurate volume and density data give reliable metal weight for cost estimating and purchasing.
Accounting for Recovery Factor
Although you can calculate weld volume and mass precisely from area, length, and material density, you should multiply that mass by a recovery factor to account for filler wasted during welding.
Recovery (or deposition) factor equals the proportion of purchased filler that actually becomes weld metal, and typical values vary by process—SMAW ~0.6–0.8, GMAW ~0.8–0.95, GTAW ~0.95—so using the correct factor converts theoretical deposited mass into required purchase mass.
Apply this practically: compute weld volume, convert to mass using density, then divide by the recovery factor to get purchase mass.
Account for process-specific welding losses and filler type when selecting the factor; document assumed deposition efficiency for cost audits.
- Calculate volume → mass (density).
- Adjust mass by recovery factor.
- Add contingency for welding losses.
Calculating Arc Time and Labour Costs

Start by calculating arc time from the weld weight, deposition rate, and an operating factor so you can predict how many hours the arc will actually be on; for example, a 5‑kg weld at a 1.2 kg/hr deposition rate with a 30% operating factor yields arc time = (5 / 1.2) / 0.30 ≈ 13.9 hours.
Next, adjust that arc time for arc efficiency and expected electrode consumption to reflect real deposition versus theoretical.
Multiply the realistic arc hours by your fully loaded labor rate (wage + benefits + shop overhead) to get direct labor cost.
Compare arc-on percentage (typically 20–40% of shift) to planned productivity for labor optimization.
Document assumptions, verify with time studies, and update rates to avoid underestimating costs and eroding margins.
Products Worth Considering

All purpose, all position rod for mild steel

【DUAL VOLTAGE 110V/220V AUTO-SWITCHING】- This welder automatically detects and adapts to any standard 110V household outlet or 220V jobsite power source. Unleash ultimate portability for farm repairs, automotive projects, construction sites, and home workshops without voltage anxiety. (220V adapter sold separately)

【Versatile Welding Rod】The E6013 welding rod 3/32'' is a versatile low-carbon steel electrode that works with both AC and DC welding currents. It delivers excellent results even with low-voltage AC machines, making it ideal for a wide range of welding applications. These welding rods are suitable for both beginners and professionals.
Estimating Consumables: Filler Wire, Electrodes and Shielding Gas

Having calculated realistic arc hours and labor costs, you’ll next quantify the consumables that drive the remainder of welding expense: filler wire or rod, coated electrodes, flux (for SAW), and shielding gas.
After arc hours and labor, quantify consumables—filler, electrodes, flux and shielding gas—to complete accurate welding cost estimates.
Use measured deposition rates, joint geometry and historical loss factors to convert weld metal mass to required filler metal, adding trimming/damage allowances (often 5–15%). Track coated electrode waste per manufacturer loss percentages and stub lengths.
- Calculate filler metal mass from weld volume, include 1:1 flux for SAW, then add trimming loss percentage to get total kilograms.
- Size shielding gas needs: a 10,000 L cylinder at 200 bar gives ~10–12 hours at 12–15 L/min; convert weld hours to cylinders required.
- Multiply quantities by unit costs, validate with past project data for accuracy.
Products Worth Considering

ER70S-6 TIG WELDING ROD: The main alloying elements of ER70S - 6 welding wire are C, Mn, Si, etc. Moderate carbon content ensures weld strength. Mn and Si, as deoxidizers and alloying elements, enhance weld's mechanical properties, crack resistance, toughness and strength

er308l stainless steel tig welding rods 1 16 x 16 1 6mm tig filler rod thin stainless sheet tubing handrail kitchen equipment low splatter corrosion resistant stainless steel welding wire tig welding accessories gta w argon arc
er308l stainless steel tig welding rods 1 16 x 16 1 6mm tig filler rod thin stainless sheet tubing handrail kitchen equipment low splatter corrosion resistant stainless steel welding wire tig welding accessories gta w argon arc
Adding Equipment, Power and Overhead Expenses
When you add equipment, power and overhead to your welding estimate, quantify each component so costs aren’t buried in a lump sum: allocate machine depreciation or rental by project hours, include scheduled maintenance and consumable spares, calculate electricity by multiplying welder kilowatts × weld hours ÷ 1,000 to get kWh and then apply your local rate, and distribute facility overhead (rent, utilities, admin, PPE) as a % of direct labor or per-weld-hour.
Sum these line items and express them both as a total per-project figure and as unit cost per weld or per kg of deposited metal to make comparisons and adjustments straightforward. Break out equipment depreciation separately, record measured power consumption, and add overhead to the Total Cost = Labor + Consumables + Power + Base Material + Overhead.
Monitor these values regularly and adjust rates when usage or local electricity pricing changes.
Products Worth Considering
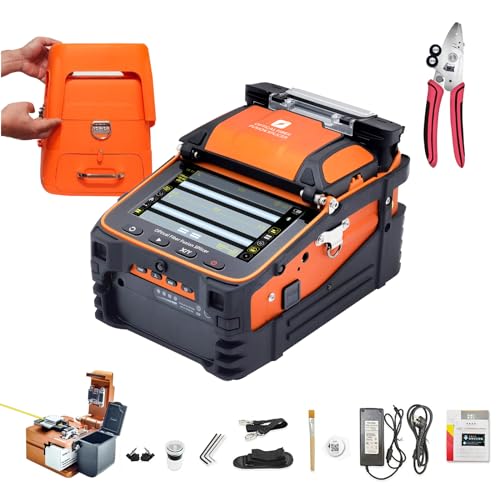
EFFICIENT OPERATION - AI-9 is a fully automatic and mainline fiber optical fusion splicer with six motors. Capable of welding long distance fiber optic lines, also outstanding performance in harsh environments such as high altitudes, deserts, and extreme cold. Comes with user-friendly bench design, small and lightweight, you can complete all your work with this set of machine.

CO2 gas mig regulator: Designed for professional MIG MAG welding applications

Brand New BETOOLL Argon / CO2 regulator and flow meter.
Using Tools, Spreadsheets and Worked Examples for Reliable Estimates
Although a good estimator can work from experience, you’ll get far more consistent results by using purpose-built tools and spreadsheets that compute weld lengths, filler metal quantities, and man-hours from entered joint dimensions and process parameters.
Use specialized software when your project needs detailed methodologies beyond general packages; it automates joint-type rules and stores historical productivity rates.
When projects demand deeper methodology, use specialized welding software—it automates joint rules and preserves productivity histories.
Download welding-specific spreadsheets for bevel, butt, fillet and TYK joints so you can enter dimensions and let formulas output total filler and labor. Populate designated cells with filler type, deposition rate and welding parameters to get accurate totals and man-hour estimates.
Include past-project data and unit-conversion quick calculators to validate results.
- Apply spreadsheet advantages: automated calculations, unit conversions, and templates.
- Cross-check with real-world job data.
- Iterate estimates and document assumptions.
Products Worth Considering

Includes standard welding symbols confirm to AWS A2.4 specifications

The spreadsheet design is for accountants or calculator Lover who love to use a software for their budget or bills or need in business for projects. You love Accounting programs and Funny bookkeeping templates? Then you'll love this too!

Richard Finch, Welder's Handbook: A Complete Guide to MIG, TIG, Arc & Oxyacetylene Welding, "Completely Revised and Updated Edition!" paperback
Frequently Asked Questions
How Do Welding Certifications Affect Cost Estimates?
You’ll pay more for higher certification levels because they raise hourly rates, require documented training requirements, and reduce rework; budget a 10–40% premium per level, plus testing and recertification fees per welder.
Can Remote or Automated Welding Change Labor Calculations?
Yes — remote welding and automated processes cut direct labor hours, shift costs to setup/maintenance, and change productivity metrics; you’ll quantify savings via hourly rates, uptime percentages, cycle times, and technician intervention minutes per weld.
How to Account for Warranty and Rework Costs?
You’ll estimate warranty claims probability and average claim cost, add expected rework strategies expense (labor, materials, downtime), allocate per-unit contingency, track actuals to refine rates, and report metrics to minimize future liabilities and improve QA.
Are Environmental Regulations Included in Cost Estimates?
Yes — you should include environmental impact and regulatory compliance costs. Estimate permit fees, emissions control, waste disposal, monitoring, and potential fines; quantify yearly costs per project and add contingency percentage for inspections and compliance updates.
What Contingency Margin Should Be Added for Project Variability?
You should add a 7–15% contingency margin based on risk assessment and project scope. Do the math: quantify uncertainties, model worst-case costs, and adjust margin toward 15% for high variability or limited data.
Conclusion
You’ve now got the steps, formulas and checkpoints to turn weld specs into a dollar figure — but before you sign off, pause. Verify the weld volume, convert to deposited mass, and run arc-time and consumable calculations one more time; a small misread multiplies cost. Cross-check labour, power and overhead against actual shop rates. Do that, and your estimate won’t just look right — it’ll survive scrutiny and protect your profit margin.
